Rest.li Architecture User Guide
Contents
This document describes how to use Rest.li to build RESTful clients and servers. The first section introduces key architectural elements and provides an overview of the development process. The remainder of the document serves as a detailed reference to Rest.li features. It is not necessary to read this entire document before using Rest.li. Once you understand the basic principles, you can refer to specific sections in this guide when you have questions. If you just want to get started exploring a simple sample implementation, see the Tutorial to Create a Server and Client.
Introduction
Rest.li is a Java framework that allows you to easily create clients and servers that use a REST style of communication. Rest.li is based on an inversion-of-control model. The framework handles most of the data flow and client/server interaction transparently and calls code you supply at the appropriate time.
Rest.li allows you to build and access RESTful servers and clients, without worrying too much about the details of HTTP or JSON. You simply define a data model (using a schema definition language) and resources (Java classes that supply or act on the appropriate data in response to HTTP requests), and Rest.li takes care of everything else. In this section, we’ll describe the flow of control and data between a Rest.li server and client. We’ll also look briefly at the development process, so you understand what tasks you need to do to develop Rest.li clients and servers, including what Rest.li does for you automatically.
The Rest.li server framework consists of libraries that provide annotations and helper classes for describing your resources, as well as an inversion-of-control dispatcher that handles incoming requests and automatically invokes the appropriate methods in your resources.
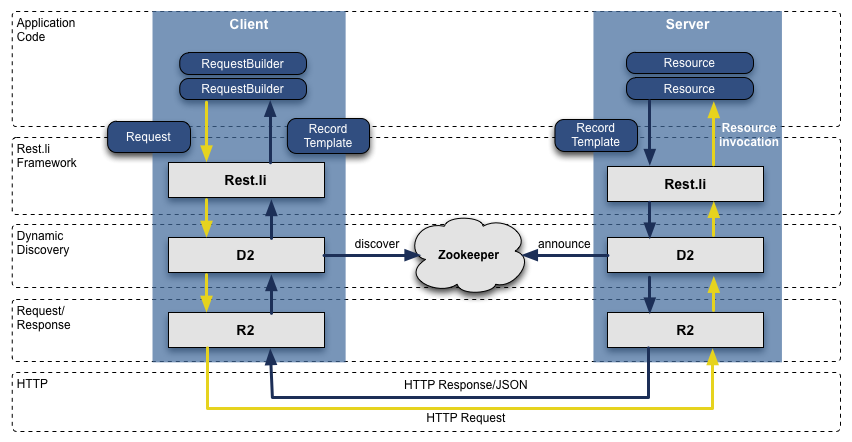
The following diagram provides a high-level view of the interaction and data flow between a Rest.li client and server. The yellow arrows indicate the flow of requests out of the client and into the server, while dark blue arrows represent the server’s response. You as a developer implement the Resource classes in the server. Rest.li provides the platform code and infrastructure for dispatching and handling requests. It also generates the Record Templates and RequestBuilder classes:
Asynchronous APIs
Rest.li is built on simple asynchronous APIs. These APIs allow both servers to run in non-blocking event based frameworks and allow client code to be written to make non-blocking calls. This approach has a couple major benefits. On the server, it means that our servers can be leaner and scale to high request throughput because we don’t need large, per request, thread pools. On the client, it makes it easy to stitch together multiple requests to servers in sophisticated flows where independent calls can be made in parallel.
Rest.li’s client implementation is Netty-based and is designed to work seamlessly with ParSeq to construct complex asynchronous request flows.
There are several server implementations:
- Servlet — Battle tested and ready for production use. Containers supporting Servlet 3.0 API are required to benefit from asynchronous, non-blocking request processing. Jetty 8.x supports Servlet 3.0 and has been used in large production environments.
- Netty — Experimental
- Embedded Jetty — Primarily for integration testing as it’s trivial to spin up as part of a test suite
See Asynchronous Resources for more details on how to handle requests using non-blocking request processing.
The remainder of this guide will assume use of the servlet server implementation.
Server Data Flow
Starting with the server (on the right in the diagram above), the following steps occur when a request is submitted to a Rest.li server:
- The R2 transport layer receives a request (HTTP + JSON) and sends it on to Rest.li. (R2 is a separate library that provides HTTP transport services. It is independent of Rest.li but is included with the Rest.li code base. It’s designed to work well with Rest.li.)
- Rest.li’s routing logic inspects the request’s URI path and determines which target resource (a Java class) the server has defined to handle that request.
- Rest.li parses the request to extract any parameters.
- Rest.li creates a new instance of the resource class designated to handle the request.
- Rest.li invokes the appropriate methods of the resource object, passing in any necessary Java parameters.
- The resource object instantiates and returns a response, in the form of a RecordTemplate object.
- Rest.li serializes the response object and passes it back to the requesting client through the R2 transport layer.
We’ll look at what you, as a developer, need to do to support this data flow shortly. Although, you probably noticed that Rest.li does most of the work. The primary task of the developer is to define the data model to be supported by your server and implement the resource classes that can produce that data. Rest.li handles the details of routing requests, instantiating resource classes, and invoking methods on objects at the right time.
When writing resource classes, it is important to understand that Rest.li constructs a new instance of the appropriate resource class to handle each request. This means that resource objects cannot store state across multiple requests. Any long-lived resources should be managed separately. See Dependency Injection.
Client Data Flow
Rest.li also provides support for writing clients. Clients issue requests by instantiating a RequestBuilder object that supports methods that allow details of the request to be specified. The RequestBuilder object generates a Request object that can be passed to Rest.li and sent to the server using the R2 transport layer. When the server responds (as detailed above), the client receives the request using the R2 transport, and Rest.li produces a RecordTemplate object (matching the object instantiated by the server) and provides the object to the client.
Both client and server work with the same Java representations of the server’s data model. Note that you do not need to use a Rest.li based client to communicate with a Rest.li server. However, Rest.li supports type-safe data exchange using Java interfaces when using Rest.li for both client and server.
Development Flow
Next, let’s briefly look at the basic development flow required to implement a client and server to support the data flow described in the previous section. Your tasks as a developer are basically to define your data model using a simple modeling language and to implement Java classes that act on or produce that data. Rest.li supports these tasks with a combination of base classes and code generation.
The following diagram illustrates the major steps in building servers and clients based on the Rest.li framework. The numbers in the diagram correspond to the sequence in which tasks are done. Blue boxes represent classes you will write, while green boxes represent components that are created by Rest.li’s code generators. Black arrows indicate a code generation process; red dashed lines indicate the use of classes that allow a server and clients to exchange data.
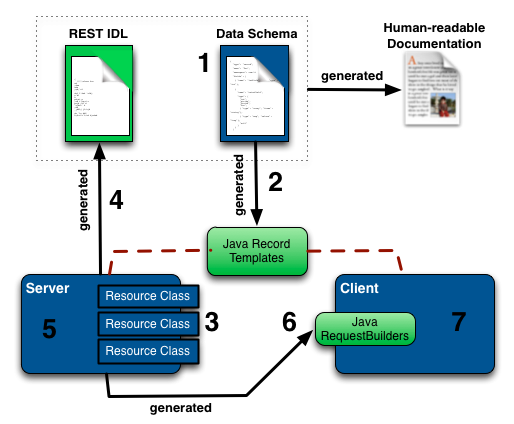
Let’s look at each step:
- Step 1. The first step in building a Rest.li application is to define your data schema using Pegasus Data Schemas. The Pegasus Data Schema format uses a simple Avro-like syntax.
- In Step 2, a Rest.li code generator creates Java classes that represent the data model defined in Step 1. These RecordTemplate classes serve as the Java representation of the data in both the server and client.
- Step 3 is to implement the server Resource classes and define the operations they support. Rest.li provides a set of annotations and base classes that allow you to map Resource classes to REST endpoints and to specify methods of your Resource classes to respond to REST operations, such as GET or PUT. Your Resource classes are expected to return data using instances of the RecordTemplate classes generated in Step 2.
- In Step 4, Rest.li generates an interface description (IDL) file that provides a simple, textual, machine-readable specification of the server resources implemented in Step 3. The IDL is considered the source of truth for the interface contract between the server and its clients. The IDL itself is a language-agnostic JSON format. Rest.li uses this IDL along with the original data schema files to support automatically generating human-readable documentation, which can be requested from a server. See IDL Compatibility for build details and how run the IDL check in “backwards” and “ignore” modes.
- Step 5 is to create your server application, which involves leveraging a few Rest.li classes to instantiate the Rest.li server, set up the transport layer, and supply Rest.li with the location (class path) of your Resource classes.
- In Step 6, Rest.li generates classes known as RequestBuilders that correspond to the server resource classes. These RequestBuilders are used by clients to create requests to the server. Together with the RecordTemplate and Resource classes, RequestBuilders provide convenient and type-safe mechanisms for working with the data models supported by the server.
- Finally, Step 7 is to implement one or more clients. Clients issue requests by instantiating the RequestBuilder classes generated in Step 6. These RequestBuilders produce Requests that are passed to Rest.li to issue requests to a server.
The Tutorial provides a step-by-step walk through of this development process and demonstrates the nuts and bolts, including build scripts and other infrastructure required to execute these steps.